This post may contain affiliate links. Please read my disclosure policy.
 What do you make when life hands you apples? Like the half bushel of them that I picked up on sale because they were starting get a bit on the old side? You have to search pretty hard to find something better to do with them than make this Lemon Ginger Apple Butter. There is so much flavor here – deep and nuanced with undercurrents of the spices and lots of the zing of lemon and ginger. It ain’t your granny’s apple butter, that is for sure!
Whenever I start working on a recipe idea, I look around online, to make sure that I am not completely duplicating an existing recipe. So, in looking for apple butter recipes, I was more than a little surprised to see so many that called for peeling and coring the apples before starting to cook them. Most of these recipes are “crock-pot” recipes, and the reason for them I guess is that they are easy, and you need to have a food mill to remove the skins and cores from the cooked apples if you do it the regular way. If you are over the moon for crock pot apple butter, then I am not going to tell you that you should try making it this way. But, on the other hand, if you are interested in a deeper flavor, less cooking time, a higher yield and true old-fashioned flavor? Then you should give this a try, because you will be amazed at the difference.
You do need to have some way to separate the skins and seeds, as noted above. There are a lot of gadgets that will do this for you, but I like my work horse food mill that I have used for at least 10 years. It is handy for making lots of things, like tomato sauce, apple sauce, really smooth pumpkin puree and even fluffy mashed potatoes. Definitely a worthy investment that in my opinion is a must-have in just about any kitchen. Here are an assortment of them on Amazon, with a pretty wide price range. [yep, I make a small percentage if you purchase through that link] I have the MUI, but read the reviews to choose the one that you think will work best for you.
So, why was I so surprised by the recipes that removed the skin and cores? Because that is where all the pectin is, and pectin is a huge help in making apple butter. It makes it set up much faster than just cooking it down will. It is still not a fast thing to make, but in my experience, leaving the skins on gives you a better flavor, a shorter cooking time, and I’m pretty sure, at least a little more nutrition. Years ago, people used to make apple butter at the same time as they were putting up apples for the winter in other ways – like canning or drying, because by throwing the peelings into the pot with the less than perfect apples, they increased the pectin, and thus, the yield for their apple butter. It was a frugal way – sort of like “nose to tail” for apples – using every bit!
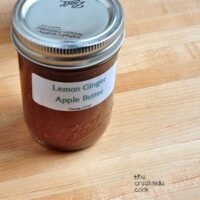
Lemon Ginger Apple Butter
Ingredients
- 6 pounds of fresh apples
- 2 lemons
- 2 – 3 ounces fresh ginger root
- ½ cup water or apple cider
- ½ teaspoon salt
- 1 & ½ teaspoon ground cinnamon
- ¾ teaspoon allspice
- ¼ teaspoon ground cloves
- ¼ teaspoon freshly grated nutmeg
- 1 tablespoon freshly grated ginger
- 1 1/3 cups dark brown sugar firmly packed
- The juice of 1 lemon
Instructions
- Wash apples and cut into chunks. Place in a large [6-8 quart] heavy pot. Add the lemons, cut into eights. Peel ginger and chop roughly – you want ½ inch or so pieces - and add to the pot.
- Add the water and salt, cover the pot and simmer over medium heat until apples are completely mushy and soft. This will take around 30 minutes. Cool slightly.
- Run apples through a food mill, removing pieces of lemon peel as you encounter them.
- Rinse out the pot and return the apple puree to it. Add remaining ingredients and cook, uncovered, over low heat until very thick, stirring <em><strong>very</strong></em> often. Watch very carefully so it doesn't burn.
- It will probably take an hour to 90 minutes, even a little longer if your apples had a lot of moisture to start with. To test it, keep a small plate in the freezer, and put a ½ teaspoon or so of the apple butter on the plate and wait about 30 seconds. No liquid should separate out – if it does, keep cooking and testing until the liquid no longer separates.
- To can, see the blog post for instructions.
- Will keep in the refrigerator for weeks - can be frozen as well.
Remember, once you get to cooking down the apples – the thicker it gets, the more it is going to want to stick, so you really need to babysit it very closely. Don’t go getting on Pinterest while you’re doing this, or you might get distracted and let it burn. If canning, bring the canner [I use an 18 quart stainless steel pot, similar to this one instead of having a regular water bath canner. Those rust out too quickly for my taste.] full of water to boil, and carefully add your jars, lids and rings – boil for 5 minutes. This is enough apple butter to make about 8 one half pint jars, plus a little over. Keeping the heat on under the canner the whole time, remove jars, one at a time and fill, leaving ¼ inch headspace. Wipe top edge of jar and put on the lid and ring, screwing lid down just until it is tight – don’t over tighten. Fill and cover each jar, one at a time, until they are all full. Carefully return the jars to the waterbath, and return to a full boil – boil 15 minutes. Leave sitting in the water for 5 minutes, and then carefully place on a towel on the counter. The lids should pop down as they cool. If any don’t seal, refrigerate them and eat up within a couple weeks. Store jars in a relatively cool place. You can also freeze apple butter in clean containers.
And then – all you have to do is enjoy…
 Upside Down Grapefruit Cake
 Double Apple Bourbon Cake
 Easy Tomato Sauce for Canning & Freezing
 Maple Walnut Rhubarb Crisp
 Brown Sugar Lemon Crinkles
 Lemon Spice Brownies
![Homemade Raspberries Preserves [no pectin recipe] from The Creekside Cook](https://thecreeksidecook.com/wp-content/uploads/2015/08/featured-400x400.jpg) Raspberry Preserves {no pectin recipe}
Raspberry Preserves {no pectin recipe} Blueberry Cheesecake Mousse
 Apple Crisp Bars
 Chai Pear Scones
Ginger produces a hot, fragrant kitchen spice.Young ginger rhizomes are juicy and fleshy with a very mild taste. They are often pickled in vinegar or sherry as a snack or just cooked as an ingredient in many dishes. They can also be steeped in boiling water to make ginger tea, to which honey is often added; sliced orange or lemon fruit may also be added. Ginger can also be made into candy, or ginger wine which has been made commercially since 1740…
Bye for now
Love this recipe.
Years ago I made apple butter with lemon rind. I
could never find the recipe again. This is even better with fresh ginger. I’m hoping to use this for Christmas Gufts to siblings. ❤️
Julia – I am so glad to hear that you like the recipe. I think this would make fantastic gifts!
Thanks Donalyn I think I might have been too aggressive with the food mill and getting a bitter after taste. I added more apples which has helped and actually added a bit more ginger (fresh). Any idea why I got the bitter aftertaste?
It is difficult to pinpoint exactly Julia – perhaps the lemons were bitter? That can happen. I am glad that you were able to adapt!