This post may contain affiliate links. Please read my disclosure policy.
 This is part two of a series of posts that will help you get started with starting your own seeds. I don’t claim to be an expert, but I do know what has worked for us, and I think I can help you avoid some beginner problems, if you are just starting out. You can find the first article here: Start Some Garden Seeds – a tutorial, Part 1 There is nothing wrong with buying already started plants from a local garden center, or even the big box stores if that is what works for you – those plants are most likely going to do just fine, and if that were my only option, I certainly wouldn’t let it keep me from starting a garden. I worked at a plant nursery for years, and absolutely loved helping customers choose the best varieties for their gardens, and I still seem to pick up some odds and ends at the local places every spring.
But starting your own seeds means you can grow exactly the varieties that are most important to you. There are literally hundreds of varieties of tomatoes, but in a really good garden center, you might find 20 different kinds, where the bigger chains will probably carry only 5 or 6. If you shop for seeds from vendors, you are going to be amazed at how many different types and varieties of each vegetable there are.
I covered some of the beginning basics in the first part, and today I’m going to take a look at keeping the new little plants healthy once they are sprouting and growing. I am planning an installment on transplanting to larger pots, and keeping everyone happy until you can get them in the ground next month.
As your baby plants grow, there are a few really important things to keep in mind. Number one is light. Keep your grow light just 2 inches or so above the tallest leaves on your plants. Tall, leggy plants are not strong – they will have weak, floppy stems that will struggle to carry enough nutrients for the plant to prosper. As I mentioned in the original article, even in a bright sunny window, plants will reach for more light. If that is your only option, at least take the best advantage of available light, but propping a piece of white foam core board [$2-3 at a craft store]on the side toward the room, to reflect every ray of sunshine you can catch. I have always had the best luck with grow lights though – they really aren’t that expensive, and with care will last for years. I have two of these, placed side by side: Hydrofarm JSV4 4-Foot Jump Start T5 Grow Light System![]() . Ours are connected to a timer that turns them on at 6:00AM, and then off at around midnight. I prop white foam core boards, which I always have around as light reflectors for my food photography anyway, around the side, which helps throw a little more light onto the plants. I admit it is not exactly an elegant display, being here in the living room, but most people looking for elegance would not start in my living room anyway, so I don’t let that stop me.
. Ours are connected to a timer that turns them on at 6:00AM, and then off at around midnight. I prop white foam core boards, which I always have around as light reflectors for my food photography anyway, around the side, which helps throw a little more light onto the plants. I admit it is not exactly an elegant display, being here in the living room, but most people looking for elegance would not start in my living room anyway, so I don’t let that stop me.
The next thing to think about is warmth, and the main tendency, I believe, is to provide too much. I definitely learned this lesson from my old boss at the plant nursery. He always said that other growers keep their greenhouse too hot, which resulted in fast, weak growth, while his slightly cooler temps meant the plants grew a bit more slowly, but they were strong, well branched and vigorous come planting time. Now, he did have his eye on the bottom line, because when you are heating 13 enormous greenhouses,even a couple of degrees of temperature difference has a big impact on your gas bill, but his advice is no less important when you are working on a smaller scale. Our house is quite cool – we turn our heat down to about 55º at night and rarely get above 63º or 64º in the daytime, and our plants do very well at those temps. So, if you keep your house in the 65-70º range, the way most people do, you definitely don’t have to worry about supplemental heat.
Then there is fertilizer. I use a very weak fish emulsion fertilizer, and apply it about every two weeks. Amazon carries organic fish emulsion fertilizer![]() , but I would look for it locally if you can find it. For seedlings, I dilute at one quarter the strength they recommend for the garden. If you use a starter mix with fertilizer already in it, don’t use more for at least a month – too much fertilizer is just as bad as not enough.
, but I would look for it locally if you can find it. For seedlings, I dilute at one quarter the strength they recommend for the garden. If you use a starter mix with fertilizer already in it, don’t use more for at least a month – too much fertilizer is just as bad as not enough.
Finally – water. While the seeds are germinating, it is important not to let them dry out. But once you have little plants, it is a slightly different story. Just as too much heat will produce weak plants, too much moisture will do the same thing. Adversity makes for strong character – in people and plants, so don’t make life too easy for these babies. Let the soil dry out a bit between waterings. When they get a little bigger, you can actually wait to water until they just start to droop a bit, before giving them a drink. I don’t mean to let them turn into crispy critters by any means, but a little droop is not going to hurt them. If you are seeing any mold, or sliminess on the surface of the soil, you can set up a fan nearby to get some air circulating and dry things out a bit. Don’t blast air right at the plants – aim the fan above the plants or to the side and the air around the plants will still get circulated. Mold, mossiness or slime is a sure sign that things are too wet or two warm – most likely both. Check over all the plants every day or two and it won’t get out of hand. I still like the mister for small plants, but you can switch to a watering can if you prefer.

That is it for today – in a few weeks, I will show you how to “pot on”, or transplant your seedlings into bigger containers prior to getting them in the garden. I will try to get to any questions right away, so leave a comment if I have left anything out.
 Favorite Plant: Sedum ‘Angelina’
 A Winter Garden Walk
 Hyperion
 Battling Late Blight on Tomatoes
 Gardening all Year with AeroGarden
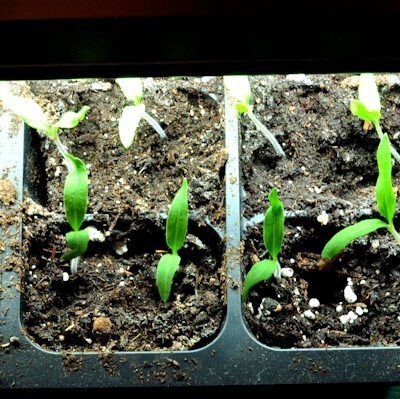 Start Some Garden Seeds – a tutorial, Part 1
 Spring Wake up Tonic for Daylilies
 Happy 4th America!
 Chive Lemon Vinaigrette
 Favorite Plant: Crocosmia ‘Distant Planet’
Creekside:
Creekside, I just found your web site and I’m in love.
When do you start your seedlings? I know it depends on your zone, mine is 5b. I live in Indiana. I have a very small garden space. Made two raised beds last year and plan to double that this year. I do have compost, which is rich in Chicken compost. Couple of years ago, I picked up 2300 lbs of chicken compost, and I still have some left over.
What about using worm casting tea to fertilize the plants? I have a ready source of worm castings available to me. (I raise them myself).