This post may contain affiliate links. Please read my disclosure policy.
 This time of year, we always encounter the same problem – using up our winter squash before it goes bad. We don’t have a root cellar, so once the weather gets below freezing for an extended amount of time, our storage spot in the garage gets cold enough to freeze the squash and once that happens, it is not salvageable. We often end up giving quite a bit to the chickens, but I try to make sure we get most of it, so I have made a couple batches of this bread and it is just too bad for the chickens that they don’t get any of it. It is some seriously delicious stuff, and if it weren’t for the ample supply of cooked squash stashed in the freezer, I might be tempted to buy some at the store to make more.
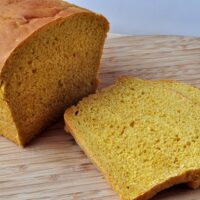
We bought a loaf of whole wheat pumpkin bread at a cider mill last fall that we both just loved – it was rich and moist, with just a bit of sweetness and a tiny touch of cinnamon flavor. I’ve been thinking about duplicating it ever since and we both thought this came very close, and was every bit as enjoyable. It’s not meant to be a particularly sweet bread, and makes really good sandwiches, hence the name. Ham and cheese, tuna salad, a veggie combo – all are fantastic on this, and guests will be wondering just what is in it that makes it so good. If you don’t have any winter squash, you can use canned pumpkin. I put the cooked squash in a fine mesh strainer to get rid of as much liquid in the squash as possible, and used 15 ounces, which is the same amount as a standard can of pumpkin from the supermarket. And if you do use squash, don’t discard the liquid you strain off – it is wonderful in vegetable soups!
You do have to plan ahead a little bit, because this bread needs to rise in the refrigerator for 12 to 24 hours. It’s worth the bother though, because that gives it a nice even crumb and better texture, as well as deepening the flavor. As you can see from this photo, that I decided to make two loaves of bread and a pan of cinnamon rolls. Just roll out 1/3 of the dough, spread with 1/4 cup soft butter, and sprinkle over a few tablespoons of sugar, combined with a teaspoon or so of cinnamon. Roll tightly from the long side and cut into 9 equal pieces, and lay in an 8 x8 inch buttered baking dish. These will be done probably about 10 minutes earlier than the bread, so keep an eye on them.
 It will likely look a little darker that some yeast breads – underbaking is more of a concern that overbaking, so do not remove too early.
Winter Squash Sandwich Bread
Ingredients
- 15 ounces of cooked mashed winter squash
- 2 cups scalded 2% milk
- 4 tablespoons melted butter
- 1/3 cup molasses
- 2 packages dry yeast
- 2 large eggs
- 2 teaspoons kosher salt
- ½ teaspoon ground cinnamon
- 2 cups whole wheat flour
- About 7-8 cups all purpose white flour
Instructions
- In the bowl of a stand mixer, using the flat beater paddle, combine the squash, milk, butter and molasses, and mix on low speed for a minute or so.
- Add the yeast and mix in – no need to proof it unless you have any doubt about the quality.
- Beat in the eggs, salt and cinnamon, and then beat in the whole wheat flour.
- Make sure to scrape down the sides as needed.
- Slowly add in 4 cups of all purpose flour, one at a time, with the mixer on low speed. Beat at a low medium speed for about 5 minutes.
- Remove the flat beater and switch to the dough hook.
- Gradually add the remaining flour, first 1 cup, then another, kneading in each one completely.
- Then add additional flour by ½ cups, until the surface of the dough is only very slightly sticky.
- Once all the flour is incorporated, set the mixer to a low-medium speed and knead for about 5 minutes. Keep an eye in things, and if it seems to be sticking to the bowl a lot, add a bit more flour – say ¼ cup at a time, and continue kneading. My final amount of flour was 7 and ¼ cups of white flour, but it is going to depend on how much liquid was in the squash.
- Gather the dough into a smooth ball, and deposit in a well oiled, large bowl, turning to coat all sides. Cover with plastic wrap, overlapping two sheets, and leaving loose to allow room for rising.
- Put in the refrigerator overnight, for at least 12 hours. You may need to punch it down at some point while it is chilling to keep it from overflowing the bowl, so check it after a few hours.
- The next day, remove from the refrigerator and punch down again to completely deflate. Let sit at room temperature until it rises again, to double in bulk.
- Turn out on floured surface, and knead briefly.
- Cut into 3 equal portions and shape into loaves, place the loaves in generously buttered 8 x 5 inch bread pans, and allow to rise in a warm place until the center is just above the rim the of pan.
- Bake at 350° for approximately 45 to 55 minutes, until very nicely browned and hollow sounding when tapped.
- Remove from pans and cool on a rack. Wrap tightly when cooled. This keep several days at room temperature, a week or so in the fridge and several months in the freezer.
Nutrition
I had thought I would make a bit of icing to spread over the cinnamon rolls, but they honestly didn’t need a thing – we ate them with just a little butter. I’m glad this makes 3 loaves of bread, because these rolls are SO worth making!
 Molasses Apple Cobbler
 Pumpkin Yogurt Crunch Cake
 Whole Wheat Gingerbread Brownies
 Lime Buttermilk Bars
 Apple Butter Caramel Bars
 Cream Cheese Chocolate Chip Cookies
 Orange Coconut Slices
 Honey Lemon Crinkles Cookies
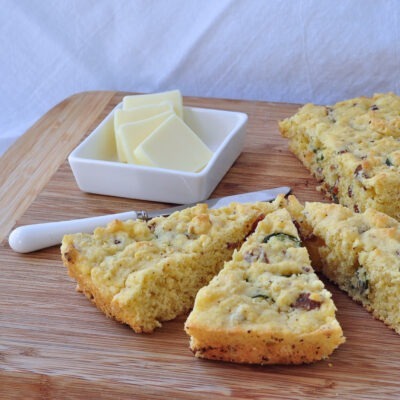 Jalapeno Bacon Cornbread
 Chocolate Chip Pumpkin Bundt Cake
this looks fantastic!
This bread looks so moist and delicious 😀
Cheers
CCU
can this recipe successfully be cut in half?
I am sure that it can without any problem.
Love the recipes. Is there a website so I can sign up for more delicious ideas?