This post may contain affiliate links. Please read my disclosure policy.
 When Larry and I first got married, his sister in law was always making this fantastic bread that I had never heard of before. I grew up in a family with a couple generations of breads makers before me – both my Mom and her Mom baked their own bread for long stretches of time, so making yeast breads was never an intimidating idea to me. But this bread was better than anything I had ever had before, and I was so glad when my new sister in law gave me the recipe. I have never changed one single thing about it – it was perfect from the first time I made it. Following a recipe without any tweaking at all is not something I do very often and to do it for over 30 years – well you know it has to be pretty good.
In moving recipes over here from my old blog, I am revamping most of them, in many cases to eliminate the boring step by step photos. Not this one though. Not everyone grew up in bread baking families, and I have always gotten lots of grateful comments and emails about the detailed instructions and photos in this post. If you are a novice bread baker, there is no better recipe to cut your teeth on, because in addition to having a fantastic flavor, this bread is fool-proof. It comes together quickly and easily, raises nice and high and bakes up perfectly. If you have any questions, please don’t hesitate to ask – I will be more than happy to help if I can.
In a large mixing bowl whisk together
2 cups all purpose flour
1 cup of cornmeal [whole grain preferably]
2 packets of instant yeast
1 teaspoon kosher salt  In a smaller bowl combine
2 cups hot water
1/2 cup dark molasses
5 tablespoons melted butter Mix the wet ingredients into the dry
 And whisk briskly for about 2 minutes
 Add 2 more cups flour, one at a time, combining well after each one. I like to use a rubber spatula for this because I think it is more efficient.
 It will be fairly sticky still
  Generously flour your kneading surface with 1/4 cup all purpose flour, and begin kneading. For some illustrative shots of kneading, go here [still on the old blog, but leaving for now till I get that one updated too – sorry ’bout the quality of those long-ago photos!]. When the first 1/4 cup is thoroughly incorporated, add another 1/4, incorporate completely and then another 1/4 cup.
 About 3/4 of a cup of flour has been kneaded into the dough at this point. It isn’t quite there yet though.
 Another 1/4 cup flour and a couple more minutes kneading and it should look like this – a little drier and smoother – just right. Total kneading time is about 6 or 7 minutes.
  Oil a bowl and place the dough in it, turning a few time to coat all the surfaces and cover with a piece of plastic wrap or small towel, and place bowl in a fairly warm spot. I have a gas stove with a pilot light, so that is where I always raise my breads.
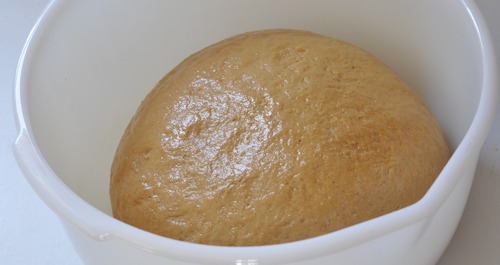 This is one of the fastest rising breads I have ever made – usually it is doubled in size in about an hour to 90 minutes.
  Turn the dough back out onto the counter [you can dust it with a bit of flour if you like, but it doesn’t usually stick even without] and knead for a couple minutes until you have a nice uniform ball again. Cut it into two equal pieces.
 Then shape into loaves. Place the half dough on the counter with the cut side up and form into an elongated oval. Fold the side farthest from you toward yourself and press along the edges to seal. Then turn it around and again pull the side farthest from you into the middle and press down. Bring the ends in until they meet in the middle. Using your fingers, kind of pinch all of the edges together and roll gently to smooth it all out. Put in a well greased bread pan and press firmly all over the top to work the dough into an even layer in the pan.
 Brush the tops of the loaves with melted butter [you can skip this step if you like – doing this will raise the calorie count of course.
 Return loaves to a warm spot and allow to rise until the dough is just above the top of the pan. It is going to raise a bit more as it bakes. Bake at 350º for about 45 minutes, until the top is very brown and the loaves sound hollow when you thump them.
 Remove from pans immediately and cool on a rack for as long as you can stand it and then cut into slices to serve.
 It is so good – just slightly sweet from the molasses, with a hearty texture from the cornmeal. It makes a fantastic sandwich with ham, sharp cheddar and a nice spicy mustard. Or just enjoy it with a bit of butter if you like.
 Upside Down Grapefruit Cake
 Anadama Cinnamon Rolls
 Pumpkin Bread with Walnuts and Raisins
 Pumpkin Yogurt Crunch Cake
 Fruit and Nut Oat Bars
 Cinnamon Chocolate Chunk Coffee Cake
 Lime Buttermilk Bars
 Chocolate Chip Pound Cake
 Chewy Coconut Almond Blondies
 Best Ever Oatmeal Cookies
I’ve made this bread several times now and it’s delicious, especially toasted. I’m a novice when it comes to yeast breads and need more experience, especially with shaping a loaf to ensure that it domes nicely in the oven. The first few times I made the bread, during the second rise the dough crested about 2 inches above the sides of the pan but collapsed during baking and I ended up with loaves with indented tops. I wondered if perhaps I was overproofing the dough so now watch the rise more closely and put the bread in the oven as soon as it passes the poke test. This has solved the problem of the top collapsing, but I don’t think my loaves bake up as high as yours. I tried the bread again yesterday and used a smaller pan to see if I could get a taller loaf. I had been using a 9 x 5-inch pan so tried an 8 1/2 x 4 1/2-inch pan (1 lb. pan) and the bread rose nice and tall but ended up with a mushroom top – frustrating! I’m wondering what size pan you use. So far I’ve been halving the recipe and making a single loaf. Would this affect the end result?
I had to check the pictures to be sure, but those are definitely my 9 x 5 pans, Sadie. If 2 inches is too much, and just crested is too little, I would shoot for in between that.
There are so many things that can have an effect on rising – your altitude, the flour, how humid it is, the oven temperature. And part of it is just practice, though it sounds like you are working on that. Making your own bread is so satisfying, and worth every moment you put into it!
*editing to come back and say: Halving the recipe might have an effect on the result, but I am not sure. you might try a whole recipe to see – you can always freeze that second loaf.
Thank you for the quick response. I’m going to try again tonight but will make the full recipe this time and use half the dough for the bread and half for your delicious-looking cinnamon rolls. I’ll try a 9 x 5 pan this time. I think the 8 1/2 x 4 1/2 pan may have been part of the problem. There was a lot of dough for the pan. I’m probably lucky the bread just “mushroomed” and didn’t collapse over the sides of the pan. The shape didn’t affect the texture in any way. The crumb was tight, tender and moist. I’m a veteran baker but had never tried making my own bread until a few months ago….it’s addictive!
Totally agree about the addiction, Sadie – I am into sourdough these days – waiting for fall weather to stick around to get my starter going again. And those cinnamon rolls will knock you dead! 🙂
I always made this with cornmeal mush. I’m excited to try this without the 10 minutes standing over the stove!
This is a great recipe, so easy! I’m baking bread almost weekly now and loving it. I’m trying this recipe with Wheat flour combo today, expecting excellence.
When I ran across your recipe, I was sure that this is the same bread my grandma used to make just about every week. I have never made bread before, but you made this sound so easy and the instructions seemed so clear, so I decided to try to make it myself. It turned out absolutely just as perfect as you said that it would. SO easy and it makes the best toasted cheese sandwiches! Thanks for bringing back great memories!
Aw, Cooper – that is so good to hear! Thanks for coming back to tell me 😍
What temperature is the hot water?
Hi Susan – the correct temperature is 100 to 110°F. Many people don’t have a way to test it exactly, so I used the “hot enough so you can just stand to hold your finger in it method”. You’re correct that I should cite the actual temperature though, and I’ll update the post. Thanks!