This post may contain affiliate links. Please read my disclosure policy.
 I love yogurt, especially Greek yogurt. Thick, creamy, rich – yum.
And, it’s really good for your tummy. This is particularly true if you make your own yogurt – just start with the most natural kind you can find to get your yogurt making started. Once you have a good batch done, you have all the starter you need for future batches, because you use some from the previous batch to get the next one going*. I started my current batch with yogurt I bought from the Farmer’s Market, from a small, local dairy. If you have to use a big-brand type, because that is what you can find in your area, look for one that is full fat, organic, and contains natural cultures.
Why full fat? Because full fat dairy products are much better for you than the ones with reduced, or no fat. Just go Google “full fat dairy vs. low fat dairy”, or “is low fat dairy healthier than full fat dairy” – the evidence is mounting – all the low fat hype is wrong.
Here is my newer Best Homemade Yogurt recipe.
A bit updated as to method, and not strained to the Greek Yogurt stage.
I will give you just 2 pieces of information that informed my current thinking, and then you can go to do your own research from there. Much of the nutrition found in milk is fat soluble – remove the fat, and your body cannot absorb the nutrition. And prior to the low-fat craze, commercial dairies sold their excess skim milk to pig farmers. Pig farmers wanted it because pigs eating a lot of fat free milk gain weight faster. Hmmmmmm.
Full fat, fresh homemade yogurt, on the other hand is full of bio-available nutrition, healthy probiotics, and fatty acids. If you can find organic raw, or at least less processed whole milk, so much the better. Grass-fed, pastured cows – best of all. As is the case with so much of our food, the closer to the actual source you can get, the better off you are.
I don’t have a source of organic grass-fed raw milk readily available, so I do the best I can, and usually make yogurt from organic milk that is less processed. I am still looking for a more local source for raw milk, from organic grass-fed cows who are not supplemented with hormones or anti-biotics, but the closest I can currently find requires a couple hour round trip. We do pick up a couple gallons from a dairy in Pine Grove PA, when we’re on our way back from our younger daughter’s house, but we go through it pretty quickly, so I get most of our milk from Wholeshare, which is a sort of regional food buying club or co-op. Wholeshare was, until recently, limited to New York, but is now available in more of the country – check it out, and see if you can join a group near you.
Anyway – even if you have to buy just regular old grocery store milk, the yogurt you make at home is still going to taste better, and be better for you – and it’s cheaper too! I make batches that result in 1 quart of finished yogurt, which take 6 cups of milk – under $4 a quart for the finished, strained, yogurt. And I have whey to use for baking – more good stuff!
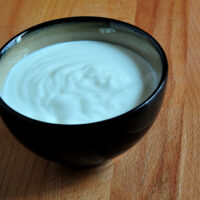
Making yogurt takes a little time, but little in the way of effort, and uses equipment most people already have in their kitchens. Milk is heated, then cooled, the yogurt starter [which is just ordinary live culture yogurt] is added, and then it just sits at around 100º until the yogurt is as strong as you like it. For Greek yogurt, which I like because it is thicker and creamier, you strain the finished yogurt through cheesecloth, or a cotton towel, step you can skip if you want to use your yogurt for smoothies, or you don’t mind it being a little thinner in substance.
Homemade Greek Yogurt
Ingredients
- 6 cups organic whole milk
- 1/2 cup organic whole milk plain yogurt
Instructions
- I make my yogurt in a half gallon canning jar - but you can use what you have that will hold 6 & 1/2 cups of liquid. You need something non-reactive, like glass or stainless steel, and if you don't have something that will hold the entire amount, you can split it in smaller amounts for the culturing time, such as a couple of quart jars.
- Put the 6 cups of milk in a large, heavy sauce pan, and place over medium heat.
- You need this to get up to between 165 and 180 degrees - watch it carefully, and stir every few minutes. An instant-read thermometer is pretty simple to use for this, or even a candy thermometer.
- ~I have recently found that getting the milk up to around 190º and holding it at that temperature [just turn the heat down a little, and keep checking the temp with your instant read thermometer] for 10 minutes results in better tasting and thicker yogurt. Either method will result in really good yogurt, but I have come to appreciate the slightly fussier method.~
- Once the milk is up to temperature, remove from the heat, and allow to sit until the temperature comes back down to between 115 to 120 degrees.
- Whisk in the 1/2 cup of yogurt, until completely mixed in.
- Pour the milk mixture into the jar, cover, and place in a warm spot - around 100 degrees is best. My house is on the cold side this time of year, so I keep the jar sitting in a pan of 100 degree water, changing it as needed to keep it warm, or use the "Proof" setting on my oven, if I also happen to be rising bread. I have also made it in my Instant Pot electric pressure cooker, which works like a charm - link below.
- You should see some thickening in about 8 hours or so. How long you let the mixture culture is up to your personal taste. I like my yogurt very tart, so I leave mine around 30 hours, but you can stop much sooner than that if you like it on the milder side - about 15 hours or so is going to give you a medium favor. Just taste it, and if it is too mild, leave it a few more hours.
- To strain the yogurt, which is what will make it as thick as a commercial Greek yogurt, line a strainer with a couple layers of cheese cloth, or a single layer of a flour sacking type towel. Pour in the yogurt, and then cover the top of the strainer with a large plate [not touching the yogurt - it is just to keep it clean, not to press it]. I actually cut a towel in half to use for this - just throw it in the wash and use over.
- Leave at room temperature for about 3 hours, or refrigerate overnight. I let it drain until I have about 2 cups of whey, and a quart of yogurt.
- save the whey, if you bake your own bread, or to use in muffins
- Store in the fridge. It will keep a couple weeks, and make sure when it begins to get low that you save a half cup for the next batch.
- Serve with a drizzle of honey or maple syrup, and maybe some dried cranberries and toasted pecans. Or whatever - when you make your own, you can put what you want in there!
- It is also great for salad dressing, tzaziki sauce, etc. if you strain it even longer, you can make yo-cheese, which is like a cross between clotted cream and cream cheese - very yummy on bagels!

*Not all store bought yogurt will have the right kind of culture to continue making yogurt indefinitely. You can buy longer lasting cultures, or just buy more yogurt every so often, if it is not culturing properly any more. A good source for cultures is Cultures for Health
Instant Pot electric pressure cooker [and yogurt maker!]
Half gallon canning jars
Fine mesh strainer
Flour sacking dish towels
note: this post contains one or more Amazon affiliate links and I make a small commission on your purchase.

 Deviled Eggs
 Lemon Blueberry Sherbet
 How to Cook a Fresh Pumpkin
 Vanilla Bean Ice Cream {Philly Style}
 The Best Turkey Gravy
 Homemade Corn Tortillas
 Veggie Frittata
 Omelet Breakfast Burritos
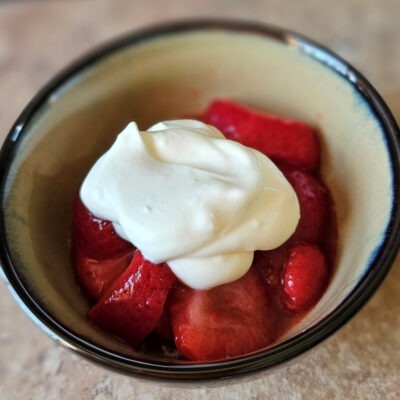 Creme Fraiche – Homemade
 Coconut Lime Mini Muffins
I love homemade yogurt but I’ve never eaten it like this. That’s dessert! 🙂
Dessert for breakfast – the best, Maureen!
Fabulous, Donalyn! I have made yogurt before, but never thought about straining it to make Greek yogurt! Thanks for another fantastic idea!!
Anytime, Bonnie – you know where to find me! 😉
Home made yogurt is definitely the best, I love the idea to make my own.
Thanks for sharing the recipe, Donalyn.
The pictures are gorgeous!
Thanks Daniela – hope you get the chance to give it a try!
This is AWESOME, Donalyn. Didn’t realize that it’s possible to make Greek yoghurt at home. Thanks for sharing!
Angie
And SO easy!
Looking so delicious and creamy. I love that last shot; looks heavenly!
Thanks Roberta!
Totally agree with you on fat! I’ve come to the conclusion that all the fat-free and reduced fat talk is basically bunk. Sounds logical — but it isn’t. Anyway, I’ve never made my own yogurt, but need to. Full of fat, of course — you actually eat less that way! Good stuff — thanks.
Very true John!
would this work to make tsaziki sauce?
Oh yes, definitely, Tom. I use it to make all sorts of sauces and salad dressings – works beautifully in all of them.
thank you!
Just wanted to come back and tell you that we made this over hthe holidays. It was a huge hit with everyone. I served it with pancakes, along with a couple different kinds of fruit and it was just amazing. I have another batch going this morning! I think it will be a regular part of our routine from now on. Thanks again & Happy New Year!
Thanks for coming back to tell me, Bonnie – I am making a batch today myself. Happy New Year to you as well 😉
This was really easy to make and we love it!
This is so much easier than I had ever thought it would be. Straining the yogurt makes it so thick and luxurious. It keeps fresh for a long time too.
Thanks for letting me know, Johnny – I agree it’s amazing how thick it gets!